Tech Tips
Detailed information on flathead engine preparation and tuning is available in Blown Flathead, and 335 HP Flathead Ford V-8 Performance Handbook. Additional tech tips or pointers listed below may also be helpful. Inquiries regarding “Roadrunner Engineering Flathead Tech Tips” should be directed to Roadrunner Engineering. Contact information is available at the bottom of web page.
For a detailed analysis of your engine, click here, print out worksheet, and send to Roadrunner Engineering, per instructions on the sheet.
Standard compression ratio calculators do not work for the Flathead because of the unique shape of the combustion chamber. Use this table.
Measuring and estimating engine power has been the subject of several books. For a short discussion, click here.
Relieving has always been somewhat controversial. To do it right requires at least some skill and proper tools. There is always some risk of ruining those now expensive blocks.
There has even been some question of the benefits of relieving. The currently offered “French” blocks are factory relieved in a similar fashion to original Ford replacement blocks of the 59A type (’48 and earlier variety). The relief on these blocks is about .08in deep by about 1.5in wide. The improvement in flow with this relief is minimal. Some sources believe this relief was added to reduce a tendency for thermal cracking of Ford flathead blocks.
In the “old days”, the relieving was done up to .187in deep at the edge of the cylinder bore and extended to the head gasket boundaries. The material removed lowered the compression ratio about .2-.3 points, e.g. from 8.5: to 8.3:1, but there was no question that relieving in this manner improved flow and thus horsepower. In a series of flow tests at Roadrunner, it was found that a .10in-.125in relief gives most of the improvement offered by the deeper relief’s used earlier and gives a greater margin for grinding error and top ring clearance. The improvement in flow is dramatic. Even the relatively “open,” low-compression, stock, cast-iron heads had an average flow improvement of 7-8%. High compression, after market aluminum heads had an increased flow capacity of 14-18%! Even allowing for the small decrease in compression ratio, relieving is a clear winner for improved flathead horsepower.
The one-belt Roadrunner kits require an alternator that mounts on the blower snout. Either 6-volt or 12-volt units are available. The 37 amp Denso alternators previously offered, looked great but were short on power. The Roadrunner One-Belt Kits can now be ordered (currently not available) with a polished, compact, Delco 121 series alternator built especially for Roadrunner. These are not the commonly seen large one-wire GM units that will not fit. This small alternator not only looks great and fits on the blower snout like the Denso, but it delivers 80 amps. It requires no external regulator and is a two-wire hookup. One wire goes to the ignition switch and the other to the battery. The P/N is ALT7937-P. See catalog. These alternators are also available locally in satin (Lester re-builder P/N 7937). If bought locally, they must be modified by shortening the mounting “foot” to use the Roadrunner tensioning rod and to line up the drive pulley when mounted on the alternator bracket on the blower snout. Ford 7000 series, Denso and other smaller alternators can also be used when modified as above. Call for details.
There is an optimum supercharger capacity (size) range for each engine which will provide good overall performance and throttle response. Too small and the engine will not perform up to it’s potential. Too large and throttle response and fuel economy suffer. The Weiand/Holley 142 blower standard on Roadrunner kits will supply enough air for even the most powerful blown street flathead and provide great throttle response. For certain racing applications or where a more massive look is desired, a Holley 174 blower is available. The 174 unit is identical to the 142 except for length, which is approximately 1.8 inches longer. This additional length is at the rear of the unit, and can be used with the current Roadrunner breather location and will not affect firewall clearance. Call for a quote or for more information.
There is no simple, accurate relationship for estimating boost and pulley size because of all the variables involved. Roger Huntington in his 1950 book Souping the Stock Engine had a reasonable estimating equation:
R = (A x D)/(K x V) where,
R is the blower drive ratio (crank pulley dia/blower pulley dia)
A is the desired manifold pressure in atmospheres (14.7 psia = 1 atmosphere)
D is the engine displacement in cu.in.
V is the Roots blower displacement in cu.in./revolution
K is a constant determined by experience. I use 1.8 .
For example, assume a 276 cu.in. engine, a 142 cu.in./rev blower (e.g. Weiand 142) and 6.6 psi boost,
A = (14.7+6.6)/14.7 = 1.45
R = (1.45 x 276)/(1.8 x 142) = 1.56
Not too bad compared to 1.5 in the example on page 49 of Blown Flathead. I use Engine Analyzer Pro software for more accurate estimates. A more complete engine analysis can be done using the Analysis Worksheet included on this web page.
All engines need a good breather to vent the crankcase. Even new engines allow combustion gases in the crankcase from leakage past the piston rings (“blow-by”). If not vented these gases can produce significant crankcase pressure causing major oil leakage out the crankshaft seals. These gases also result in water condensation and acid buildup in the oil, shortening engine life. Recently I replaced the breather cap on the ’36 engine in my ’32 with a used, but better-looking cap. My formerly low leak engine began leaking about one quart in a 20-mile drive! The replacement cap was found to be severely restricted even though it had been cleaned and looked fine. A new cap cured the problem. A “road draft” ventilation system was used on later flatheads but a modern positive crankcase ventilation system which routes the blowby to the intake manifold was never offered on the flathead. If such a system is installed, the fuel delivery curve must be adjusted to handle the additional intake air. A PCV system venting to the manifold on a supercharged engine can cause the A/F to go lean and initiate detonation by introducing an oil-laden air mixture when boost (and blow-by) are maximum. The safest approach is to vent the breather to atmosphere directly or route above the carburetor inlet (e.g. air cleaner base).
For 1949 and up, Ford redesigned the flow passages in the head gaskets, the block and the heads to promote more uniform cooling of the cylinders and eliminate hot spots. With the later 8BA design, more coolant is encouraged to flow from the water pumps back through the block. The coolant then flows through the enlarged holes at the rear of the block and into the rear of the heads. From there it flows to the front of the heads and back to the radiator through the head outlets, which were relocated in the front of the heads. Even though the heads will fit, do not use the ’48 and earlier heads (or head gaskets) on ’49 and up engines. Even though this is commonly done for appearance reasons, cooling capability may be compromised. It is also very important to orient the head gasket properly on the ’49 and up engines as marked on the gasket.
For 1949 and up, Ford redesigned the water pumps to flow approximately 25% more coolant than previously. Total flow is rated at approximately 75 gpm @ 4000 engine rpm. This was accomplished by increasing the size and number of vanes or “paddles” from six to eight and giving them a more efficient curved pumping shape. The additional coolant flow and velocity enhances heat transfer. The additional pumping pressure also increases the coolant pressure in the engine cooling passages thus discouraging the formation of vapor bubbles and hot spots. At the same time the water pump seals and bearings were upgraded for increased reliability. If pulley location allows, late water pumps may be used on early engines, but the impellors must be trimmed as described in Blown Flathead. The bypass circulation hole at the top of the late pumps must also be plugged when installing the late pumps on the early engines. The stock early pumps require engine oil for lubrication and cannot be used without substantial modification on later engines. Speedway Motors can provide redesigned early-style pumps with self-contained lubrication, better bearings and better seals like the later pumps, but they do not have the late high flow impellors.
Ford introduced a pressurized cooling system for the flathead in 1941. For 1949 and up, the overall cooling system pressure was increased from four psi to seven psi. The radiator pressure cap and the structural strength of the rest of the system had limited the system pressure and were all upgraded accordingly in 1949. The additional system pressure further increases the coolant pressure in the engine over and above the levels achieved by the later, larger water pumps, thus further discouraging the formation of vapor bubbles and hot spots. Of course, the higher pressure also increases the boiling point of the coolant and increases the cavitation (vapor formation at the pump inlet) resistance of the water pumps. It is generally desirable to increase the pressure in the cooling system to 12 psi or more when modern radiators are installed. Caution must be used for the early cars with the large upper radiator tanks like the 1934 because the pressure acting on the large upper tank area can cause catastrophic failure. Also, the water pump seals on the pre-1949 engines may be marginal at high pressures. Therefore the system pressure should be limited to 9 psi or less even with new construction radiators if the large tank design is retained or the pre-1949 water pumps are used.
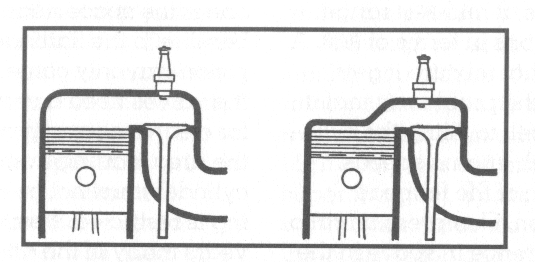
In 1932 the flathead Ford V8 incorporated the “turbulent” head design patented by England’s Sir Harry Ricardo in 1919. A diagram of the turbulent head design compared with a previous conventional head design is shown below. What Ricardo found was that a large clearance space over the piston remote from the valves encouraged premature ignition or detonation of the fuel-air mixture in that area. The result was poor fuel economy, lost power, and in many cases, engine damage. Conventional thinking at the time suggested making the clearance even larger to reduce the compression ratio and detonation or “knock” tendencies. This worked with extreme clearances but at the expense of fuel efficiency and power. What Sir Harry did was reduce the clearance as shown in the figure to a tenth of an inch or less. This allowed the relatively cool piston and head to keep the thin space cool enough to prevent ignition until the flame front incoming from the sparkplug did the job as intended. The thin “squish” area also greatly improved turbulence and mixing of the fuel-air mix. The result was smoother running, higher compression ratios, better fuel economy, lower octane gasoline requirements, and more power. Wow! For more information on the turbulent head and other Ricardo innovations, I highly recommend early (fourth and previous) editions of Ricardo’s book “The High Speed Internal Combustion Engine” published by Blackie and Sons.
Conventional internal combustion engine head design in 1919 on the left. The Ricardo “turbulent” head design is on the right. Diagram courtesy of Hot Rod Press.
Flat top pistons are not recommended for most flatheads because they defeat the advantages of the Ricardo head discussed in the preceding tech tip. Most heads for the flathead Ford are domed over the piston unlike the sketch above and should use pistons with a matching dome. Unless the head is flat over the squish area of the piston (like the figure on the right in the Ricardo sketch), do not use flat top pistons.
The blower boost can be tailored for good performance and reliable operation with flathead compression ratios from 6.5 to 9.0:1. Optimum supercharged street performance is achieved with compression ratios of approximately 7.5 to 8.0:1. A 7.5:1 compression ratio gives better fuel economy than lower ratios while providing better volumetric efficiency and minimizing the octane requirements associated with higher ratios. For a 276 cubic inch engine, this translates to a head combustion chamber volume of about 75-80 cc. Stock iron heads come with this size chamber. Custom aluminum heads are also available. Some high compression aluminum heads, like the Offy 425, can be modified to achieve the desired volume and promote better breathing by removing about 0.06 to 0.12 inches of material over the valves (not over the piston). Some material can also be removed in back of the valves to the gasket line. Be sure and leave a 0.125 in. or larger radius in the inside corners to prevent stress risers and promote more flow.
For normally aspirated street flatheads, a compression ratio of about 8.5:1 gives good results. See the December 2002 issue of Street Rodder for a discussion of compression ratio vs. breathing for normally aspirated flatheads. A reprint with corrected plots is available from Roadrunner. A chart for estimating the compression ratio of the Ford flathead can be accessed in link above.
Ford head bolts are a good product! I recently completed a study where I measured the hardness (correlates with strength) of two brands of commonly available grade 8 head bolts and several stock Ford flathead head bolts. The stock pieces were identified with either a script or block letter “F” and the numbers “1041.” The Ford bolts were harder (and therefore stronger) than the grade 8 pieces! NOS or good used Ford head bolts will give good service in a blown engine. Call for test data.
The required serpentine drive belt for all Roadrunner kits is best purchased and trial fitted locally because of all the combinations of pulleys and assemblies possible. These belts are commonly and inexpensively available at any auto supply in almost any size. The P/N’s for these belts indicates the number of ribs, the rib design, and the length. As an example, if you have a street kit for the 1949-1953 flatheads with a 5.63in drive pulley and a 3.75in blower pulley, you may use a 6 rib, "K" series belt, 72.5 inches long. The Goodyear P/N is 725K6. A similar 71 inch long belt is P/N 710K6, and so on. The variable position of the alternator bracket and the tensioner adjustment allows a belt to be fitted and tensioned easily.
On applications without an automatic tensioner, proper serpentine belt tension can be obtained by feel and experience. A tension gage can be very helpful, however. A “Krikit II Pocket Gauge,” Dayco P/N 93866 or NAPA P/N KR2, is handy and inexpensive. A belt tension of approximately 120 lbs. is a good place to start when the belt is cold. Tension can be adjusted easily, usually by hand, using the tensioner rod. A jam nut is provided to lock the rod in place, but is not necessary. Do not over tension. Compare similar belt tension on a modern car for practice.
The 6-rib serpentine belt drive used in the Roadrunner kits will give maintenance free service in most street applications. Systems running boost pressures greater than about 6 psi however, may require periodic cleaning of the pulleys with brake cleaner and the application of a belt dressing such as made by Permatex to the belt to prevent squealing and slippage under high boost. A high boost idler assembly to increase crankshaft pulley wrap is available for 1-belt kits running over 6-psi boost. A fully automatic tensioner is also available for these kits.
A bypass valve is used on “blow-through” positive displacement supercharger systems such as those found on the Ford Lightning trucks. They are necessary to prevent the air inlet ducting between the blower and the throttle valve from being over-pressured when the throttle is closed at high engine rpm when boost is greatest. This valve also helps fuel economy under part throttle cruising with these systems since the blower is not forced to pump against a high back pressure. A “suck-through” supercharger system where the carburetor or throttle body is located at the supercharger inlet (such as the Roadrunner system) do not require a bypass valve and fuel economy benefits are minimal under low load operation since the supercharger is generally pumping in a partial vacuum.
Positive displacement supercharger systems with a positive drive such as a chain, cog belt or gear drive require a blow-off (e.g. burst plate) to protect the system in the event of a backfire or other overpressure system. Systems such as the Roadrunner with a non-positive belt drive do not require a blow-off valve because they can slip (and backup) under extreme pressure conditions. Enclosed supercharged marine engines are not permitted by law (i.e. it’s illegal) to use a blow-off valve which releases a combustible mixture into the vessel.
An anti-seize compound of some type is recommended for stainless steel or aluminum threads to prevent galling. Also, care should be taken not to over tighten these threads since most are equivalent to grade 2 or less. Permatex thread sealant, P/N 14A, provides anti-seize, thread sealing and some locking capability. Medium strength (blue) thread locking compound provides some anti-seize protection and sealing qualities while providing adequate thread locking where lock washers are not used. Lock washers are not provided in the Roadrunner kits.
Supercharging results in much higher cylinder pressures than encountered with normal aspiration, and requires a good head-to-block seal. After initial head installation and head bolt torquing, four warm-up, cool-down, and re-torque cycles are recommended before operating the engine at full throttle.
There is an optimum ignition timing for every combination of engine, fuel and operating condition. As blower and cylinder pressure go up, the engine needs less advance for peak power, so retarding the ignition is a good thing for power under boost. Retarding the ignition timing, either manually or automatically, is also often desirable to decrease detonation tendencies on supercharged engines, especially when using lower octane fuel. MSD (P/N 5462 or 6462) and others, provide automatic electronic boost retard modules for any ignition. Unfortunately, it is difficult to determine optimum settings without a dyno, so be conservative!
On the later flathead engines, crankshaft pulleys with an outside diameter of 6in or more will require shortening the timing pointer (on the front cover) approximately 0.125in for clearance. All Roadrunner crankshaft pulleys are provided unmarked. The user must provide the timing marks. After TDC is located (preferably before the heads are installed), the pulley should be marked appropriately with a scribe or small triangular file. Additional marks should then be spaced .00873 x OD of pulley (in inches) per degree. For example, the separation distance for 2 degrees on a 6in pulley is 2 x .00873 x 6 = .1in (approximately).
On kits requiring water pump pulleys or hubs to be press fitted, a press force of several hundred pounds is required for proper retention. Manufacturing and or rebuilding tolerances may not provide the desired fit. If the parts present a loose press or no press, additional retention methods should be used. Options include tack welding, installation of setscrews or pins, knurling, or application of adhesives such as Loctite 620 or Permatex High Strength Sleeve Retainer, which are designed for this purpose.
The Roadrunner one-belt kits are designed to be as compact as possible to minimize fit problems in any application. For this reason, the kits are designed to use the compact Mallory distributor for top mounted distributor applications. The Mallory is available in point or electronic versions and can be used with electronic CD modules such as the MSD-6 and others. The new Vertex magnetos and magneto-type distributors look good and also fit. The larger MSD and HEI type distributors may be used, but will require pulley spacers and/or belt rerouting. Call Roadrunner for details.
The blower lubricant level should be approximately halfway in the front sight glass or between the marks for dipstick equipped units. If additional lubricant is required, add 80W-90 or 85-140W gear oil meeting GL-5 specifications through the brass plug on top of the front cover. Do not use synthetic gear oils in these units because the seals are not compatible with these lubes. The rear bearings are sealed and should require no attention for the life of the unit.
1. A good starting point for the serpentine belt size is an AutoZone P/N 470K6 or equivalent. Tensioning of the serpentine belt is automatic with the standard Weiand supercharger unit furnished.
2. The Nostalgia kit requires an Offenhauser P/N 1093 offset generator bracket (not furnished) for stock generator mounting. For the V-belt, a Gates P/N TR22570 or equivalent will be a good fit. Do not over-tension the V- belt, since the early water pumps won’t take it and light tension is all that’s required anyway.
3. The Nostalgia kit requires the stock 2-piece, 1946 - 1948 distributor cap, P/N 59A-12105 (outer cap) and P/N 59A-12106 (inner cap) for proper clearance of the ignition wires with the blower belt when used with the stock distributor or the Mallory units. The new MSD units can use the crab-type caps.
The stock manual transmissions for the flathead give satisfactory performance under normal driving conditions, but will not survive hard launches reliably even with stock engines. Not to worry since there are several options for upgrading the transmission both manual and automatic. Five speed (including overdrive) manual transmissions such as the Borg-Warner T-5 or Tremec work great because they are compact and efficient and several adapters are available. The Ford C-4 automatic (three speed) works well for the same reasons. The C-4 is the only automatic that does not usually require metal cutting to install in an early Ford. An add-on aftermarket unit is required if overdrive is desired. There are also adapters for almost any EOD or AOD transmission but since these units are large they often require major surgery to install and they use significant horsepower just to drive the transmission.
As many flathead owners have observed, the idling oil pressure for a warm flathead is often 10 psi or less. While 10 psi is sufficient at idle (it should rise approximately 10 psi per 1000 rpm) it is not very comforting to those used to the higher numbers from modern engines.
Melling Engine Parts manufactures a high volume oil pump for the flathead designated the M-15 which delivers 25% greater volume capacity than their model M-19 which is the stock equivalent. Peak oil pressure is set by the oil pressure bypass valve (either in the pump or in the engine), however the higher capacity will produce significantly higher oil pressure at low engine speeds. To use the high capacity oil pump in 1948 and earlier engines, a truck oil pickup tube assembly, P/N 8RT-6615 is required. The 1949 and up engines can use their stock oil pickup assemblies. Some bending of the pick up tube may be required to assure adequate clearance (about 1/2in) between the oil pickup screen and the oil pan. The oil pressure relief valve in the center valley of the older engines is usually left in place even though the new pumps have a built in relief valve.
In the past we could pretty much assume that if we used motor oil that met the latest American Petroleum Institute (API) specifications, we were using the best lubrication product and technology for our engines. Then approximately three years ago alarming reports surfaced reporting high wear and early failure of engines and engine components particularly those with heavily loaded flat tappets and flat tappet cams. Conflicting studies followed that revealed changes in parts, applications and the oil.
From the available data it appears that a major contributor to the problems was the reduction of an antifriction oil additive, ZDDP (zinc dialkyldithiophosphate). ZDDP forms a tough film that protects metal parts under extreme pressure conditions. Unfortunately the zinc and phosphorus in this compound can foul modern catalytic converters. For this reason, the allowable amount of zinc in most oils was reduced to 870 ppm in 2005, even though many experts feel that the optimum level of ZDDP for wear protection is 1200-1400 ppm. Diesel oils provided an option for a time but they are now also subject to reduced levels of ZDDP. There are additives such as STP that can also boost ZDDP levels, but many of these formulations do not reveal the content, leaving the consumer in the dark as to how much is just right. Too much can foul plugs.
Currently specialty oils are available that maintain a 1200-1400 ppm level of ZDDP. The most common are racing oils, including the best seller, Valvoline VR-1. Racing oils are blended with the primary function being protection of the engine rather than the catalytic converter. The downsides are higher costs and lower detergent levels requiring more frequent oil changes. A good tradeoff I believe. Thus at this time, I recommend racing oils such as Valvoline VR-1 for most flathead applications. At temperatures above freezing, SAE 20W50 meets the requirements of all flathead Fords, stock or modified.
There are several air filter systems promising more horsepower by allowing more airflow. Most of these filter elements are of the cotton gauss type, which are oiled to enhance dirt capture. The good news is that the filters do flow more air for the same size as a standard pleated paper filter. The bad news is that they also flow more dirt. Using a well known manufacturer’s own data for one of these filters vs. the SAE data for a standard pleated paper filter, and calculating the difference in filtering for a 302 cubic in. engine traveling 12000 miles, the difference was over one more pound of dirt ingested by the engine with the high flow filter! This is particularly harmful on tow vehicles which may spend long times at high throttle opening in dusty conditions. There is definitely a trade-off here. You can often maximize airflow by eliminating the filter altogether if engine life is secondary.